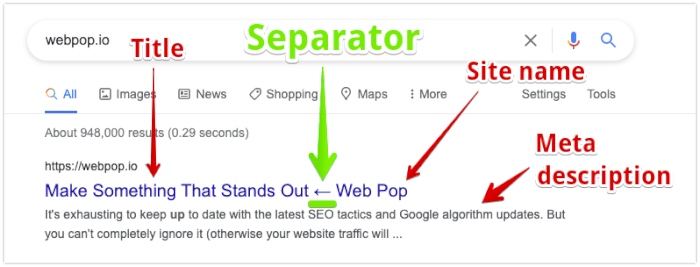
When your page pops up in Google search results, Google shows some key details about it to the person searching.
The main parts are:
- The title of the page
- The meta description of the page
- The website’s name
- The separator
It looks something like this:
By default, most Shopify themes will set your separator to a dash (“-”).
A dash works, but it’s pretty common. Switching to a unique separator can make your site stand out in search results, offering a fresh twist amid the usual.
So here’s how to change the separator of your Shopify store.
What is an SEO Separator?
A separator (also known as an “SEO separator”) is what separates the title of your page from your website’s name when people see your page in the Google search results. A separator is typically a dash (“-”) by default. But it can also be set to other characters, such as a pipe (“|”) or arrow (“←”).
How To Change Your SEO Separator on Shopify
- Log In As An Administrator To Your Shopify Store
- Take A Backup of Your Shopify Store
- Navigate To Online Store → Themes
- Edit Your theme.liquid File
- Find Your Title Tag And Change The Separator
Log In As An Administrator To Your Shopify Store
You’ll need a sufficient staff permission level to edit your Shopify theme.
The easiest way to guarantee you’ll be able to edit your theme is to login as an administrator.
Login at https://accounts.shopify.com/store-login
Take a Backup of Your Shopify Store
While you technically don’t need to take a backup first, you probably should.
Editing your theme files is risky—you might accidentally make a tiny mistake that causes big problems. It’s like walking on thin ice where one slip can crash your entire store.
So I would highly recommend you backup your Shopify store before proceeding with the next step.
Not sure how to back up your store? Here’s a guide for you. I’m emphasizing this because I’ve seen many store owners accidentally crash their sites, so consider this a friendly heads-up.
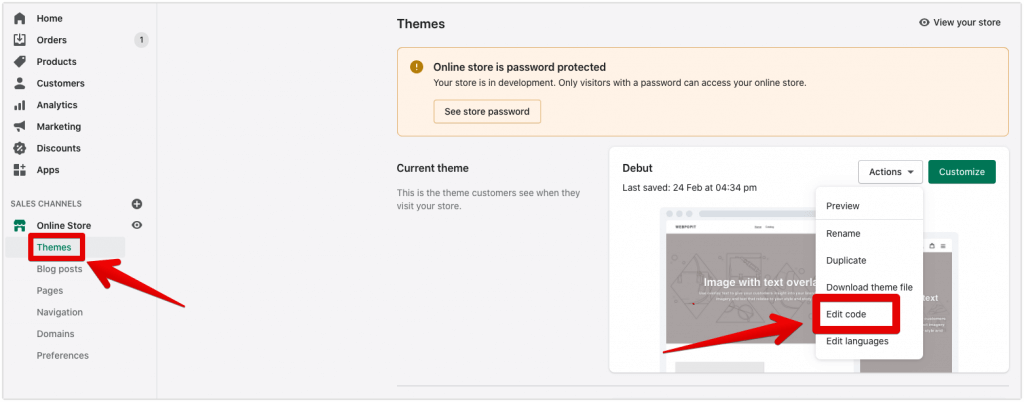
Navigate to Online Store → Themes → Actions → Edit Code
Once you log in, there should be an “Online Store” option under the heading “SALES CHANNELS” in the left-hand sidebar.
Click on Online Store → Themes.
Then there should be a dropdown button labelled “Actions”.
Click this button, then click “Edit Code”, as per the screenshot below.
Edit Your theme.liquid File
Now you should see a search box on the top left of your screen.
We want to search for the theme.liquid file, as per the screenshot below.
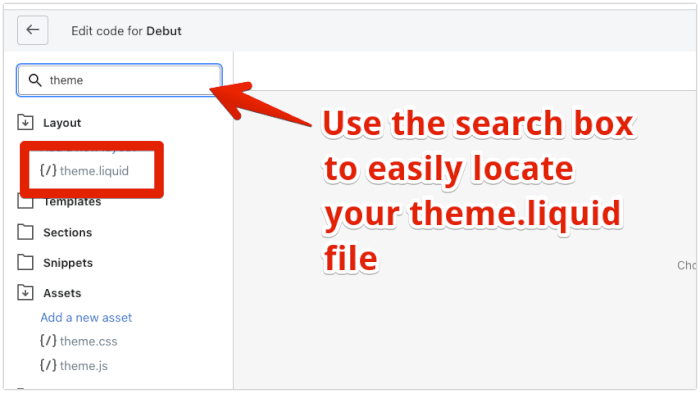
Click on the theme.liquid file to open it.
Find Your Title Tag And Change The Separator
Once you open up your theme.liquid file, you should see a big chunk of code pop up on your screen.
If you’re not familiar with HTML and Liquid (the programming language Shopify uses to create their stores), then you might be like this right now—

Don’t worry… this is the normal reaction to seeing a big chunk of code.
We only care about one line of this—the <title> tag.
Ctrl+F to the rescue 🦸🏼♂️
Hit Ctrl+F (or CMD+F on a Mac) and search for “<title>” (without the ”).
You should see something like this—
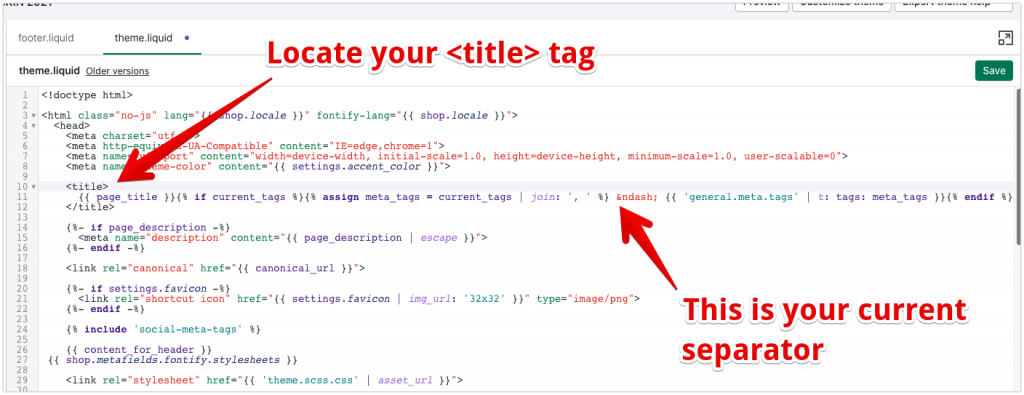
Since every Shopify theme is coded differently, your code might look a little different to my code above.
But what you’re looking for is the – in between the <title> tag (where the title starts) and the </title> tag (where the title ends).
– is the HTML encoding for a dash (“-”), and this represents your current SEO separator.
You want to delete this – and replace it with your desired separator.
Personally, I like the arrow (“←”) separator for increased conversion rate (it stands out in the Google results. It’s what I use for Web Pop).
Or the pipe (“|”) separator.
The benefit of the pipe is that it doesn’t take up many pixels.
And since Google limits your <title> tag by its length in pixels, this can help you squeeze in more product information into your title in Google without it being cut off.
")
")