Think of uploading a HTML file to your Shopify store like learning a simple magic trick, not rocket science. It’s way easier than it sounds, and I’m here to guide you through it.
No time to spare (for my horrible jokes)?
Click here to jump straight to how to upload a HTML verification file to Shopify.
Otherwise, learn more about what Google Search Console site verification is (and how long it lasts) below.
If you’re trying to verify your domain in Google Search Console (or other platforms like Pinterest), one verification option is to upload a HTML file to the root directory within the code of your Shopify theme.
(Google Ads conversion tracking and Google Merchant Center also often require verification).
This will confirm to Google that you are the rightful owner of the Shopify store.
Shopify does not allow you to directly add a HTML file to your store’s root directory.
However, you can edit your store’s theme code and add a HTML meta tag to verify your Shopify store with Google.
Having your site verified in Google Search Console gives you more visibility into how your customers are finding your Shopify store on Google.
Once you know what keywords you’re ranking for, you can double-down on what’s working. This will increase your rankings further, giving your even more organic traffic.
(and more sales 🤑)
So you have good reason to verify your website with Google.
But before we get into how to verify your site in Google Search Console—what exactly is verification?
What is Verification in Google Search Console?
Verification in Google Search Console is the process of proving to Google that you own your domain (in this case, your Shopify domain). Verifying your site with Google will give you access to Google’s search data, allowing you to find the keywords that your store is ranking for. This data can be used to grow your traffic and increase your store’s sales.
How To Verify Your Website in Google Search Console
Once you’re in your Google Search Console, you’ll need to add a new property from their property selector bar.
To do this, we’re going to add a HTML tag to your Shopify theme.
(in the <head> section. But don’t worry—we’ll explain exactly where this is).
You can also upload a HTML verification file, or add a DNS record to your domain registrar.
But those methods won’t be covered in this guide (because they’re not needed).
All verification methods do the same thing—verify your site with Google.
So once we add a HTML tag to your Shopify theme, your store will be verified, and you won’t have to do anything else.
How Long Does The Verification Last?
Think of Google as a diligent guard, regularly checking if your site’s verification is up-to-date. They look for the HTML tag you added. If it’s missing, you’ll need to do the verification dance again.
Failing the authentication means you lose access to the search console data and tracking tools that Google offers.
How to Upload Your Google HTML Verification File to Shopify
- Get Your HTML Verification Tag From Google Search Console
- Add Your HTML Verification Tag To Your Shopify Theme
- Verify That Google Can See The HTML Verification Tag
1. Get Your HTML Verification Tag From Google Search Console
To do this:
- Log into your Google Search Console account.
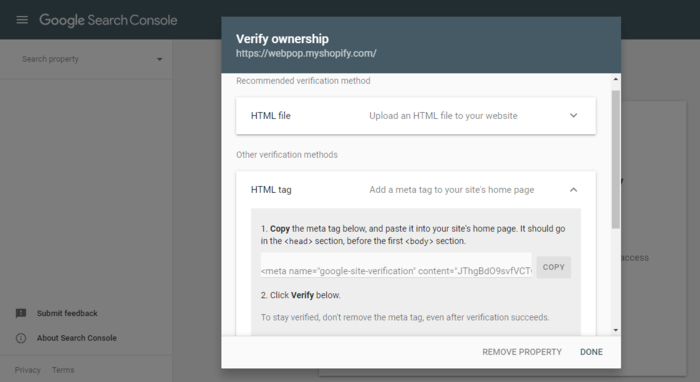
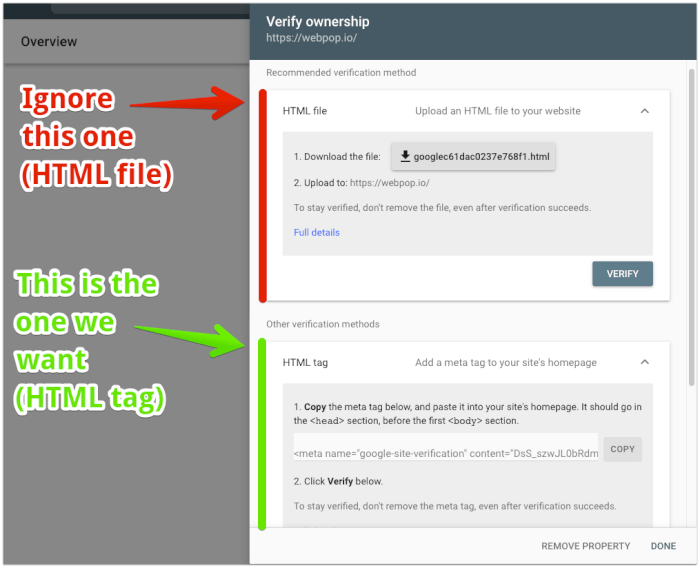
- Find the option to verify your site via meta tag or HTML file. Google Search Console typically has this option under the Alternate Methods section.
- Once you hit the drop-down arrow, copy the full HTML tag to your clipboard which contains the
<meta name=google-site-verification>tag.
2. Add Your HTML Verification Tag To Your Shopify Theme
Once you have your HTML tag from Google Search Console:
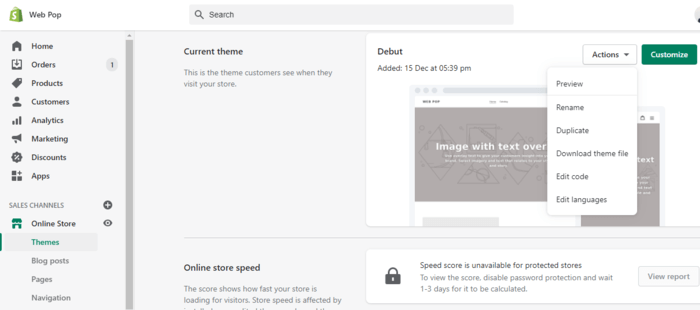
- Head over to your Shopify account.
- Click on the Admin tab.
- Click on Online Store.
- Open up your Themes.
- Choose the current theme of your Shopify store.
- Click on Actions.
- Select Edit Code.
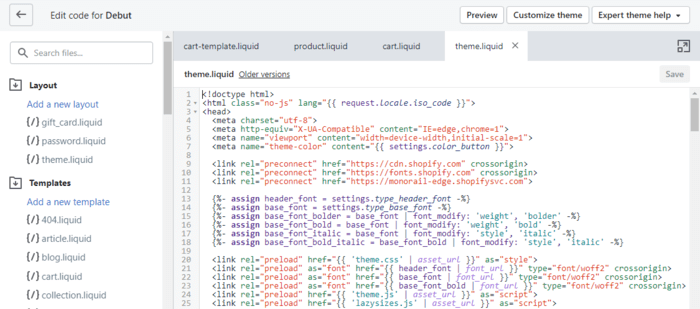
- 8. Find the Layout section.
- 9. Under that, select the
theme.liquidfile to open up the code editor. You can type “theme.liquid” into the search bar to find the right file. - 10. Paste the meta tag under the
<head>tag. Make sure you copy and paste the entire HTML tag exactly how it is in Google Search Console for the verification to work. - 11. Click Save.
3. Verify That Google Can See The HTML Verification Tag
Return to Google Search Console and click Verify to complete the verification process.
Wait a few minutes for the Google site verification to complete. Once it’s verified, you’ll be able to start seeing data collected about your domain on Google Search Console.
When setting up a new website for your business or new Shopify store, this should be one of the first things you need to do. Otherwise, you won’t be able to refer to past data during the time when you didn’t have the HTML files uploaded. You can always email the Shopify support team for additional help.
Final Thoughts
Wrapping it up, nailing the upload of an HTML file to Shopify is your ticket to Google’s treasure trove of search data.
It’s like having a secret map to discover the keywords that draw customers to your store, boosting your visits and sales!
")
")