There are many ways to lose your Shopify store.
You could accidentally open a phishing scam and get hacked.
You could be the victim of a DDoS (Distributed Denial of Service) attack that takes your website out.
Or … you press the wrong button and delete something by mistake 😅️
Losing your beautiful Shopify store that you’ve spent months designing.

Imagine if one day you couldn’t get into your store at all, or all your products, customer info, and images just vanished. That’s the kind of trouble you could face without a backup.
A backup ensures that the “worst case scenario” ain’t that bad.
There are quite a few methods to backup a Shopify store.
Some paid, some free, some easy, some complex.
I’ve seen too many complex or pricey guides out there. That’s why I’ve simplified things here, showing you step-by-step, affordable ways to back up your Shopify store.
Enjoy the peace of mind that comes with knowing you’ll always have your store information, no matter what happens.
(Or which button you press by mistake 😅️).
Let’s dive in.
How To Make A Complete Back Up Of A Shopify Store Manually
- Generate CSV Files From Your Shopify Store
- Copy And Paste Store Data
- Organize And Save Backup Data
- Import Data Into Your Online Store
1. Generate CSV Files From Your Shopify Store
One way to backup your store is by manually generating CSV files of essential data from your store. Unfortunately, Shopify doesn’t allow you to backup the entire store, only some of it. Here is the data that can be exported with CSV files:
- Customers
- Products
- Theme
- Orders
- Discount codes
- Gift cards
- Financial data
Here are the steps to generate backup CSV data.
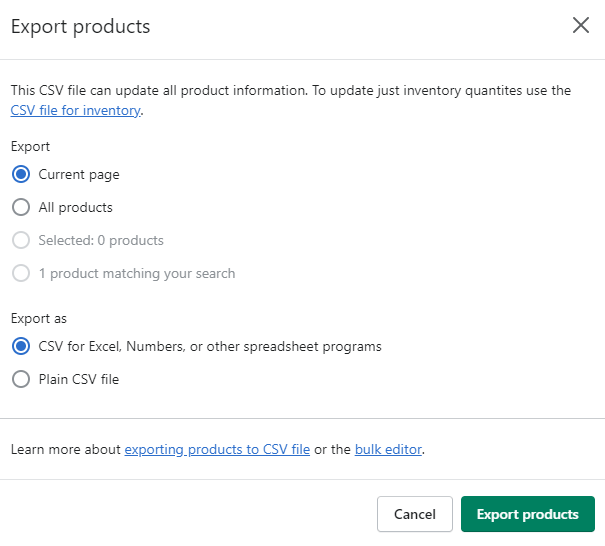
- Log into your Shopify dashboard.
- Go to the page with the data that you want to download. For products, go to Products > All products. For customer lists, go to Customers.
- Click Export.
- Choose the set of data that you want to export whether it’s all data or selected data.
- Select CSV for Excel, Numbers, and other spreadsheet programs
- Select the Export button.

It’s important to keep in mind that there are some limitations to using CSV files to export and store information.
- Once the information is imported into a CSV file, it can’t be reversed
- Sorting the CSV in the spreadsheet may cause some information such as image URLs and product variants to change
- Importing a CSV file that has already been sorted could cause the existing data to be overwritten with bad data
2. Copy And Paste Store Data
Unfortunately, Shopify does not have the function to allow you to export everything in CSV files. This means that you can’t export product images, blog content, or custom product categories.
You have to copy and paste any images, content, and categories from Shopify in separate Word or Excel files.
3. Organize And Save Backup Files
Organize the store backup CSV files and other backup files you’ve manually copied. You’ll need to access these files easily and understand the information if that you need to retrieve a backup of your store.
Remember, manual backups need refreshing whenever you update your store. Why not set a calendar reminder? Weekly or monthly, it’s your call. That way, you can always roll back to a specific version if needed.
Consider securing your backup as well so that hackers or malicious employees can’t access them. Use an encryption code or strong passwords to protect your data from being accessed by unauthorized users.
It’s smart to store backup copies in different spots, just like you wouldn’t stash all your important cards and cash in one place. Diversify to keep your store’s info safe and sound.

4. Import Data Into Your Online Store
The unthinkable has happened and you need to import data into your new store. Ensure the new store that you start is on the same subscription plan that the original Shopify store is on and has the same theme.
- Log in to your Shopify dashboard.
- Go to the page that corresponds to your CSV file. For example, go to Products > All products to import your items.
- Reinstall the apps that you’ve previously had.
- Manually configure your Shopify store settings such as payments, checkout, shipping, and taxes.
- Copy and paste your content and blog posts from your backup files.
- Rebuild the online store navigation from your previous store.
You can always contact the Shopify support team if you need help.
How To Make A Complete Back Up Of Shopify Store Using An App
- Rewind Backups
- Automatic Backups
- ExIm ‑ Export / Import Data
Besides creating manual backups, another solution is to use an app to create backups automatically. Here are some apps to create backups for your store.
1. Rewind Backups
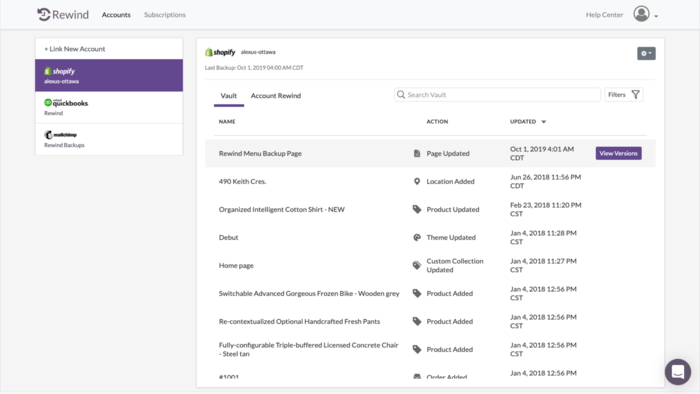
The Rewind Backups app allows you to restore your website in the case of an attack or undo changes from your website.
The app supports reputable brands such as GymShark, MVMT Watches, and Endy which might give you peace of mind about its effectiveness. To start, simply add the app to your Shopify store, and begin your seven-day free trial. The app will help to save essential information every day into CSV files.
Key Features
- Perform daily backups to key components of your website including customer orders.
- Rewind and restore any missing information lost within minutes from a specific time period.
- All data items are stored in a secured and encrypted location.
- Help available from their support team via phone, email, and chat.
Price: 7-day free trial and $3 per month
2. Automatic Backups
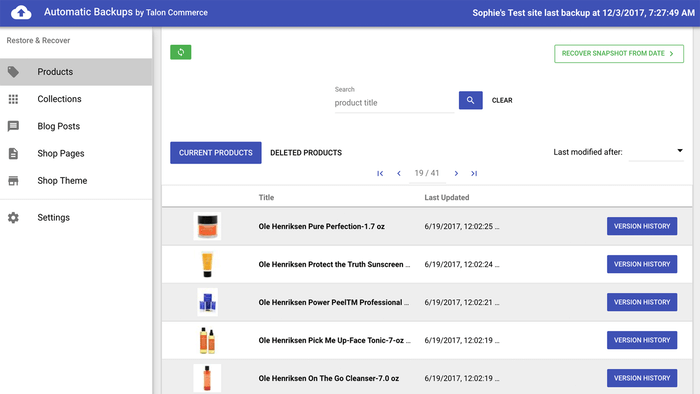
Automatic Backups is a set-and-forget app. It automatically will backup your Shopify stores anytime changes are made. This app even allows you to see a full history of your online stores and rewind back to any version you’d like.
Key Features
- Recover and rewind a category from a specific date.
- Compare items from your current version to previous versions of your online store. Rewind and restore to a previous version with a click.
- Able to get help by speaking to their support team on a live call
- Back up information from previous apps
- Able to customize which items to restore and which to leave alone.
Price: 14-day free trial and $8.95 per month
3. ExIm ‑ Export / Import Data
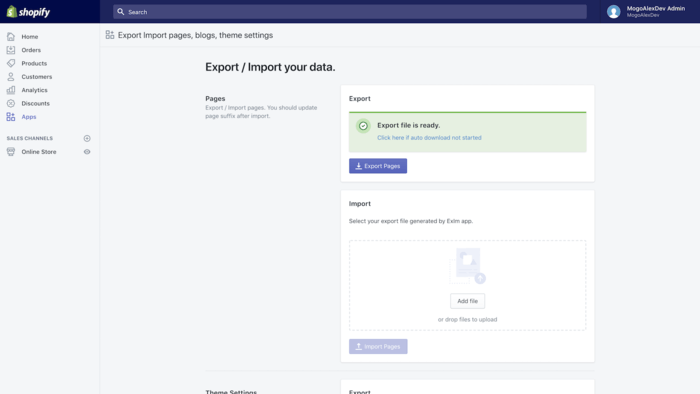
ExIm is a free app for exporting data from your store. It isn’t exactly a backup app like the first two apps on this list. You can only backup blogs, pages, and themes and not the whole store.
However, you can automatically create data backups. This is pretty good functionality for a free app. You can opt for this way if you want to keep costs low.
Key Features
- Export or import pages, theme settings, and blogs with the click of a button
- Clone pages or blogs from an existing store
Price: Free
How To Backup Your Shopify Theme
Besides backing up your store data, Shopify also allows you to back up your theme files. You can either download your theme if you want to export your settings to a new store or duplicate your theme so you can restore the backup every time something goes wrong on your original store.
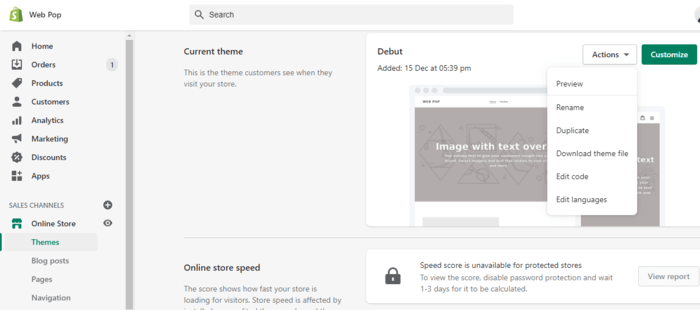
Here’s how to download your Shopify theme.
- Login to your Shopify dashboard.
- Go to Online Store > Themes
- Select Actions > Download Theme File
Follow these steps to create a backup copy of your Shopify theme.
- Head over to your Shopify admin page.
- Click on Online Store and then tap on Themes.
- Select the theme that you want to copy.
- Click on Actions from the drop-down, select Duplicate.
Final Thoughts
Losing your store’s data can hit hard, possibly erasing orders you haven’t filled yet, and hurting your sales. Plus, you’d spend precious time and effort trying to get things back to normal.
The best solution is to backup your Shopify store to have access to all of the important files you need. Once you have the backup files, getting a new Shopify store up and running will be much faster.

")